TARAWA: CG III - Utmost savagery. An AAR.
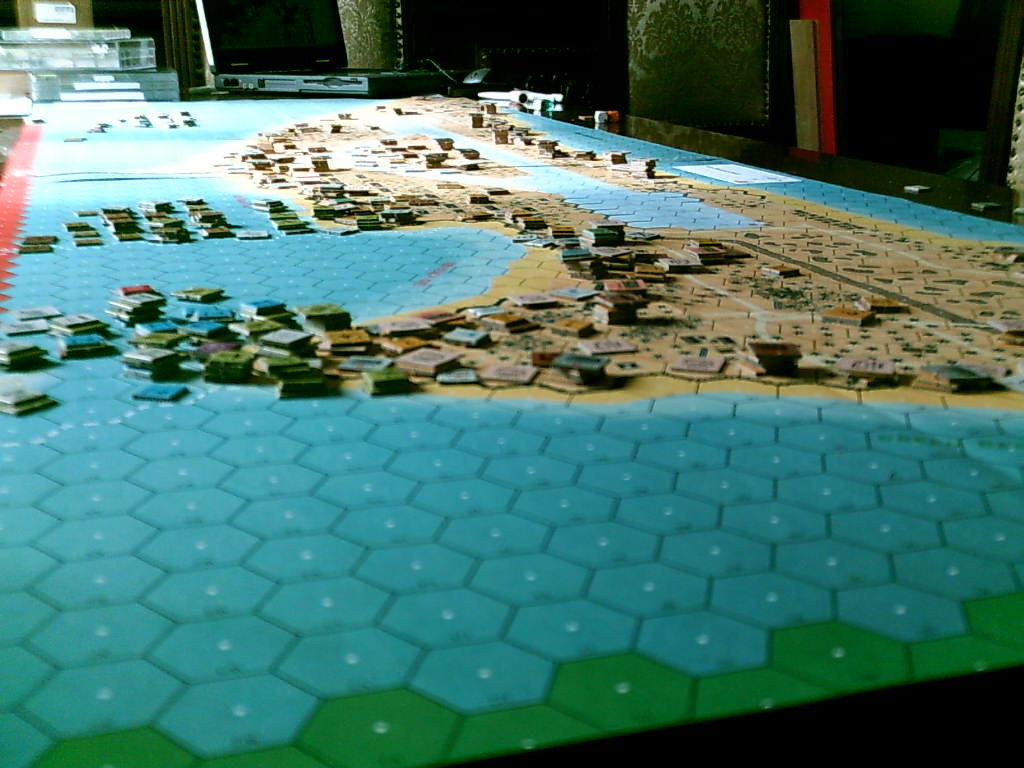
Years ago, when I really looked in the box of "Blood reef: Tarawa", historical module 5 of the ASL serie, I clearly thought "I'm not going to play this in my life...". I had not read yet the rules about the Japanese and PTO terrain, the map was too big to be opened anywhere in my house, I didn't know anyone interested in a campaign game with Advanced Squad Leader. Then I met Sergio64 and the other people of ASL Italia. With Sergio we decided to try Tarawa. First we had several games with the Japanese, then we played the mini campaign on Gavutu Tanambogo; after an year we were in position for starting the CG III of Tarawa, "Utmost savagery".
Tarawa brings effectively Advanced Squad Leader on the operational level, thanks to several exceptional conditions: invading from the sea a small atoll there are no manouver spaces on flanks, the battlefront is narrow and fixed, time of operation is set as are orders of battle with minimal reinforcements.
CGIII - date 1 - 20 nov. AM
As the American player I was faced with the organization of the assaulting waves and the problems of a regimental commander. Where hit the ground? Where are the enemy concentrations? Will I have a balanced force? Will I have the front space to deploy my force?
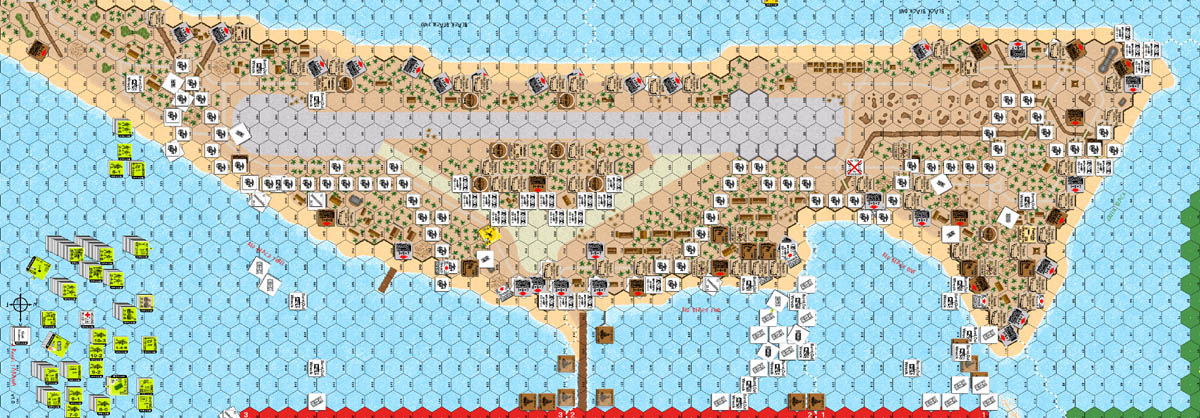
Looking at Sergio deployment I noticed that he concentrated in front of the pier with a veritable fortress of concrete bunkers backed by a fort in the middle of of the island, made of trenches and bombproofs behind a wire barrier. Drawing the firing ranges and arcs of the pillboxes I obtained the following image.
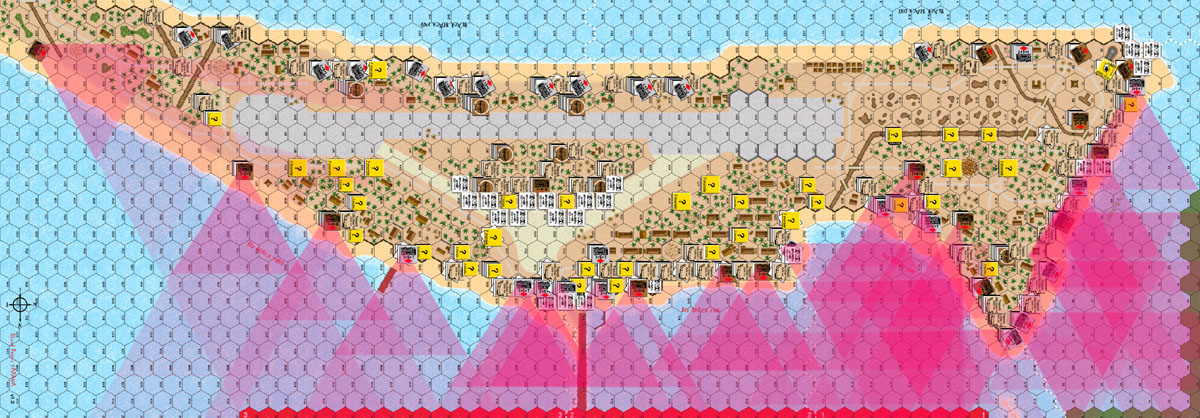
I take the
language from the original descriptions of the atoll, that described it as
a bird.
I decided to
avoid the worst fire concentration, the one covering the pier and the
deadly area in front of the "neck" even if could have led to
traps.
|
USMC overall plan On Red Beach 1 I
aim for rushing to the "beak". This people has to take the beak and conquer the "head" of the
island engaging the most of the enemy garrison. My grasping hand. |
|
Japanese overall plan The
plan is to survive as long as possible and to inflict as many
casualties as possible to the Marines while crossing the ocean to
land on the island. After the initial crossing the only
possibility to survive will be to make the USMC pay an high price
for each terrain they have to cross and for each pillbox they have
to destroy. |
The Plan for the landing
Consequentely I target the naval bombardment against the bunkers effording the cones of fire on my avenues of approach. I hope mainly in the smoke screens raised by the artillery impact, I do not expect it to be too effective. After the fall of the bombardment I obtain what I expected: no pillbox has been destroyed, Japanese losses are minimal. The effect of the smoke deletes for one turn some fire cones and I enter the map as planned.

I'm haunted by the words I read in a AAR: "first wave is a complete write-off". I enter my men on the map expecting horrendous losses. They have to suffer to help the second and third waves to touch the beaches.
Landing manifest: 20 AM.
*** On Red Beach 1. The anvil.
|
Wave 1: medium tank platoon and a company of marines reinforced with a hw platoon, plus HQ, on LTV. |
First objective: grasp a foothold on
the "beak". |
|
Wave 2: light tank platoon and a company of marines reinforced with a hw platoon, wading. |
Step on the beak |
|
Wave 3: a company of marines, the hw company, the scout sniper platoon, wading. |
Struggle the tip of the beak from the Japanese's hold |
*** On Red Beach 2. Sacrificial lambs.
|
Wave 1: medium tank platoon and a company of marines on LTV. |
First objective: Be obliterated by the fire
coming out of the whole enemy
front and lay the "carpet of wrecks". |
|
Wave 2: two companies of marines, plus HQ, wading. |
Head stubbornly for the breast. |
|
Wave 3: the rest of the hw platoon, the 75mm howitzer battery, on LVT. |
Survive, somehow. |
*** On Red Beach 3. The seaborne blitzkrieg.
|
Wave 1: two light tank platoons. |
First objective:
Invade the underbelly and hit the concealed Japanese vehicles behind the
palms. |
|
Wave 2: a company of marines and the rest of the hw company, on LVTs. |
Make a beachead on the "underbelly". |
|
Wave 3: two companies of marines reinforced with two hw platoons, plus HQ, on LVT. |
Make a large beachead on the "underbelly"! |
|
|
|
Turn 4. End of American turn
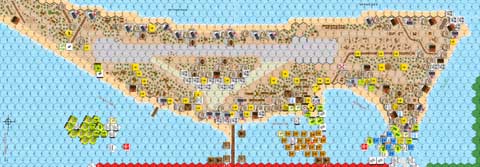
Click on the beaches. Click here
for the whole image
Turn 6.
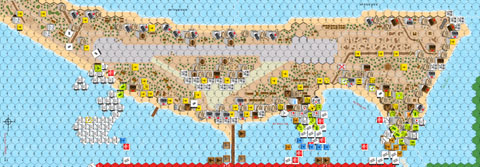
Click on the beaches. Click here
for the whole image
Japanese
20 am comments
The
naval bombardment has been quite ineffective destroying some empty
building but reducing some crew and some squads with the loss of a LtMTR
near the pier and the airfield; also a leader has been wounded and a
Korean squad reduced.
The
Marines have avoided the pier attacking, covered by the smoke, the beak
and the west of the pier with tanks and LVT while in the far east only
light tanks are beginning the attack toward the east of the island.
The first wave on the beak has been almost totally annihilated even if the tetrahedrons have not caused any damage; only two of the starting LVT have been able to download the USMC on the beach while other have been destroyed or immobilized. This will be a bonus for the US because the wrecks and the immobilized LVTs will give a cover for the other two waves while the men on the beach have been able to destroy the first pillbox and then enter the island. The tank have been able to reach almost unarmed the beach due to the fact that only AT 37L are present and only on the beach I can hope to immobilize them.
At
the end of the morning the USMC have been able to advance a little in the
beak eliminating some guns and conquering all the pillbox in the area.
The
first wave in the centre have been able to reach the shore with only few
squads and some wounded leader but they have been able to eliminate the
crew manning the Year 3 ART type gun which was the only able to destroy
the Shermans that are coming ashore. The second and third wave have
followed the first but paying a great toll. A squad have been able to
re-man the ART gun destroying one of the Sherman and slowing down the
advance of the following waves but at the end of the morning have been
eliminated together with the 37L AT that from this beach was causing
damage on the beak.
The first wave on the east has been able to advance almost without opposition due to the smoke at the beginning and the loss of a 140L gun due to malfunctioning; moreover, the Type 95 HA-GOs have demonstrated their inability to match even the light USMC tanks being destroyed one after the other in a futile attempt to stop the approaching USMC.
Because the first two waves have been of only tanks very little casualties has been obtained on this beach, only the third one on LVTs have paid some toll to the 37L AT placed near the center and covering the east part of the island.
USMC Casualties
| Red Beach 1 | Red Beach 2 | Red Beach 3 | TOTAL |
| 87 CVP | 106 CVP | 42 CVP | 235 CV |
Japanese casualties
| 6 x Light tanks | 4 x Guns | ||
| 10 x Crew | 5 x Squads | 11 x HS | TOTAL |
| 1 x Leader 10-0 | 2 x Leader 9-1 | 3 x Leader 9-0 | 85 CVP |
Surviving
USMC forces per beach
During the rephit phase other USMC loss are 7 CVP
due to wound and losses on wading infantry.
|
Beach One |
Beach Two |
Beach Three |
|||||||||
|
|
At start |
OK |
% |
|
At start |
OK |
% |
|
At start |
OK |
% |
|
SFCP |
2 |
0 |
0 |
SFCP |
2 |
1 |
50 |
SFCP |
2 |
2 |
100 |
|
Leaders |
20 |
12 |
60 |
Leaders |
20 |
8 |
40 |
Leaders |
20 |
15 |
75 |
|
Squads |
30 |
22 |
73 |
Squads |
30 |
9 |
30 |
Squads |
30 |
24 |
80 |
|
Halfsquads |
27 |
10 |
37 |
Halfsquads |
27 |
3 |
11 |
Halfsquads |
27 |
16 |
59 |
|
Crews |
3 |
3 |
100 |
Crews |
6 |
5 |
83 |
Crews |
3 |
3 |
100 |
|
MMG |
18 |
15 |
83 |
MMG |
18 |
7 |
39 |
MMG |
18 |
13 |
72 |
|
HMG |
3 |
1 |
33 |
HMG |
3 |
2 |
67 |
HMG |
3 |
3 |
100 |
|
60mm LMT |
9 |
5 |
56 |
60mm LMT |
9 |
3 |
33 |
60mm LMT |
9 |
8 |
89 |
|
|
|
|
|
75mm LInfG |
3 |
1 |
33 |
|
|
|
|
|
81mm MT |
4 |
2 |
50 |
81mm MT |
4 |
2 |
50 |
81mm MT |
4 |
3 |
75 |
|
M4 Sherman |
7 |
4 |
57 |
M4 Sherman |
7 |
3 |
43 |
|
|
|
|
|
M3 Stuart |
6 |
5 |
83 |
|
|
|
|
M3 Stuart |
12 |
9 |
75 |
|
Survivors average |
58% |
Survivors average |
44% |
Survivors average |
82% |
||||||
|
USMC player impressions BAD! Naval bombardment. GOOD! Air
support. Entered on the first turn, had the japs keeping heads down for
the whole date and put three 200L turrets and a tank out of action.
|
|
Japanese player impressions GOOD! The ineffective bombardment have left almost all position intact. The
rate of some 37L AT and of the MGs from the bunker near the beak
have been awesome causing a lot of casualties on the wading
infantry on Red Beach 2 and Red Beach 1 due to the reciprocating
cover insured by two AT 37L that have been able to fire for almost
all the turns. BAD! I’ve lost too many important guns due to malfunction and following disablement especially the gun on Red Beach 3 lost very early have permitted the USMC to have a good toehold on the beach. The Type 95 HA-GOs are almost useless: they cannot do anything even against the M3A1 and are no problem for the infantry too. The USMC air support has been very deadly eliminating three of the four Vickers gun and making the movement of squads along the isle very dangerous, together with the Vickers they have also eliminated one other gun. I’ve forgot to place any Tank Hunter hero near the beaches.
|
***
An episode: over the wall.
The first leathernecks hit the beach on the beak, emerging from a wrecked
LVT. The survivors are an half squad and a leader 9-1. The beach hex they
step on is overlooked by the pillbox on the very end of the point,
containing a 37 mm AT gun, and by a trench containing a japanese squad
that fires a LMG on the Americans, turning them fanatics and having an
hero appear. The Sherman tanks wading behind the marines unleash
supporting fire that destroys the occupants of the pillbox, reduces the
japanese squad and leaves pinned the survivors. The marines roll the
needed TC and jump over the seawall, attack the
japanese pinned half squad in CC and occupy the trench. The Japanese commander
reacts with all at hands: from the adjacent trench a twin half incher fires
at point blank and kills the US hero, while a concealed squad, led by a 10-0, abandons a pillbox looking on "Green Beach".
The imperial infantry ambushes the marines and jumps on them in CC, wounding the 9-1 marine
officer; hand-to-hand melee ensues in the
bloody trench. American support fire hits the melee - I hope in the better
morale of the Americans: instead the marines half squad is chancely killed
by boxcar MC. In the trench remain the japanese squad and 10-0 leader,
brandishing his katana, against
a single, wounded 9-1 marine that fights like a lion: In the following CC
phase everybody gets killed in melee.
The first attack over the wall ends with a lesson: every step hinland has
to be backed by organized, mobile support fire bases.
Japanese overall comment
I’ve covered very poorly the east beach forgetting to place (as was the initial plan) a gun in the far east of the map and probably fortified too much the centre. This could be a problem in the next days if, as I expect, the USMC will attack the centre from the two flank and not from the pier.
I have to hope that the fire from the Black beaches is enough to delay the USMC movement.
Situation at the end of 20 AM and plan for 20 PM.

USMC overall comment
I
lost the date's battle, anyway I'm really satisfied of the invasion. The
flank beaches have been taken as planned, and I have a toehold in the
center too.
On Red Beach 3 there are 32 squad equivalents, 4 .50 HMG, 8 tanks, 3 81mm
mortar, it's a reinforced battalion.
On Red Beach 2 the marine battalion was maimed: 75% of infantry were
killed. I kept an eye on the marine company in the very first wave: of 4
leaders, 9 squads and 6 half squads, they arrived on the beach a squad,
half and a wounded 9-2 - at the end of the date they were all dead.
On Red Beach 1 results of the landing were various and I have a mixed
force with the scout snipers and some tank.
The next date I'll push less inland and more on the beaches along the
shore to clear pillboxes and ease the follow on forces' landings. US
machine gun nests and mortar batteries are going to be set up to shoot at
all Japanese positions, plaster his strongpoints and stop reinforcements
shifts.
My final objectives for the evening of November the 20th are: consolidate the beacheads, clear the most of Green Beach and take the jungle in the underbelly, with the command bunker and Red Beach 3, altogether conquering 6 pillboxes.
Landing manifest: 20 PM
First
wave. Support elements of the invading battalions are sent ashore hoping
that the Japanese is too engaged with the marines already landed.
*** Red Beach One: two companies of engineers.
*** Red Beach Two: a company of engineers and some bulldozers.
*** Red Beach Three: two sections of armed halftracks.
Second
wave & third wave: a whole "Follow - on" battalion on LVTs
runs straight
for Red Beach Three.
*** Red Beach Three: HQ company, three companies of marines, one HW
company.
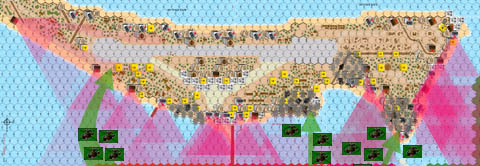
Situation at the end of 20 PM.
(refit phase counters shown on map)
***
An episode: grasping the neck.
The first mission for the marines ashore on Red Beach One was taking the
fortification complex around the deadly command bunker looking from the
Neck down the cove between Red Beach One and Red Beach Two. The Japanese
have been shooting with heavy machine guns from the morning, accounting
for scores of killed marines, shot with .50 bullets while wading the reef.
The position is backed by several bunkers and trenches; to suppress it the
Marines set up a platoon with MMGs and two tanks on the beach, while
81 mm mortars launch white phosphorus and all the 60mm light mortars from
the Beak rain grenades on trenches and foxholes around the command bunker
in hex M17. The first marine platoon with three squads appears in front of the
"wood and sand" bunker of the outer ring and easily shoot away the Japanese
squad inside. These American troops move aside and the second marine platoon, with
three squads and a 9-2 leader, steps ahead to take the trench network behind the bunker.
In a palm hex a Japanese sniper fells the 9-2 leader and the squads weaver, seeing
the attacking platoon in dismay Japanese light mortars open up from
several directions: at the end of the bombardment the marine platoon is
routed with severe losses.
Platoon after platoon is pushed ahead while the firebases pound without
respite the imperial troops; when a detachment breaks, it routs back and
fresh troops out of reserves and rallied soldiers take its place.
Later the marines thrust a engineer platoon in
the trenches and the last reserves are sent to block them, a HA-Go light
tank and two halfsquads. The marines call for their own reserves and crush
the counterattack: a Stuart with AL knocks out the enemy light tank with
bounding fire, the engineers blast with flametrowers the Japanese infantry.
Attrited in frontal firefight the surviving halfsquads around the command
bunker have not the strenght to hold the marines, the last crew inside is
striped and the fortified complex falls to close combat hopeless for the
imperial soldiers. Oblique attacks and strikes on the exposed flesh are the best
weapon for the Japanese, that must avoid frontal firefight.
USMC overall comment
The afternoon of the first day of invasion
was completely different from history, I succesfully pushed inland on all
beaches even if at a cost.
On Red Beach One I had to crack the command bunker complex on the Neck and
advance along the beaches to take more bunkers to get out from debris
and wire masses and only a the end of the date I had the frontage to deploy my forces. I succeded
in taking half of the Head with methodical use of
massive firepower, mortar fire and timed attacks; I also cleared the
bunkers looking on Green Beach assuring a safe corridor for troops
paddling in later.
On Red Beach Two the losses were even: a Sherman was literally dismantled,
ending "abandoned", "MA malfuntioned", "CMG
malfuntioned" and "immobilized", I had three wounded
leaders out of the four present, but to my surprise I did not suffered
counterattacks: the japanese forces had been attrited and Sergio neither
has too much to act with. At the end of the date I reached the airfield and
joined on the right with forces from Red Beach One. The ability of expanding
this beachhead, the less reinforced and the more battered, is an hint of
the overall situation for the following date.
Red Beach Three was the stage for the biggest battle, I had here more
troops and the wider frontage. With the help of several tanks and air
support my troops dueled with japanese stroingpoints and conquered two
command bunkers, one the Island Command Center.
Moreover I landed the reinforcements with slight losses, and on Red Beach
Three I piled up another whole USMC battalion.
The surprise was finding at the end of the
day how few Japanese troops were still standing on the island. The effect of
costant marine firepower is deadly even for fortified troops.
The Japanese
player cannot muster more than sparse platoons on the frontline, while the
USMC was plenty of fresh troops. I runned out of 10-3 counters!
The Japanese called for the Night Banzai charge for the 20 Night date, without success. Game was to proceed to the date of 21 AM, anyway looking at the balance of forces the players agreed to abandon the campaign for excess of USMC forces.
Balance of forces for 21 AM.
|
USMC |
RATIO US:JN |
Japanese |
||||
| unit type | qua.ty | totval | totval | qua.ty | unit type | |
|
10-3 |
6 |
18 |
||||
|
10-2 |
6 |
12 |
4 |
2 |
10-2 |
|
|
9-2 |
2 |
4 |
||||
|
8-1 9-1 |
19 |
19 |
6 |
6 |
9-1 |
|
|
8-0 |
4 |
5 |
10-0 8-0 |
|||
|
7-0 6+1 |
6 |
1 |
8+1 |
|||
|
LEADERS |
43 |
LEADERS 3:1 |
14 |
LEADERS |
||
|
LEADERSHIP |
53 |
LEADERSHIP 5,3:1 |
10 |
LEADERSHIP |
||
|
DC |
22 |
|||||
|
FT |
11 |
|||||
|
M3A1 |
5 |
1 |
Type 95 |
|||
|
M4A2 |
6 |
|||||
|
M3 GMC |
9 |
|||||
|
TANKS |
20 |
TANKS 20:1 |
1 |
TANKS |
||
|
MTR 81 |
5 |
|||||
|
Art 75 |
4 |
|||||
|
1 |
AA 120L |
|||||
|
1 |
AA 75 |
|||||
|
2 |
AA 12.7 |
|||||
|
1 |
ART 75* |
|||||
|
4 |
AT 37 L |
|||||
|
GUNS |
9 |
GUNS 1:1 |
9 |
|||
|
668 |
57 |
342 |
||||
|
768 |
15 |
105 |
||||
|
348 |
18 |
54 |
||||
|
248 |
38 |
76 |
||||
|
Hero |
7 |
|||||
|
104 |
26 |
448 |
||||
|
3 |
1 |
348 |
||||
|
8 |
4 |
238 |
||||
|
40 |
10 |
447 |
||||
|
6 |
2 |
347 |
||||
|
4 |
2 |
237 |
||||
|
24 |
8 |
347 |
||||
|
2 |
1 |
237 |
||||
|
1 |
1 |
137 |
||||
|
54 |
18 |
336 |
||||
|
1 |
1 |
126 |
||||
|
INFANTRY |
577 |
INFANTRY |
247 |
INFANTRY |
||
|
28 |
12 |
LMG |
||||
|
MMG |
50 |
266 |
59 |
11 |
MMG |
|
|
.50 cal |
8 |
96 |
64 |
6 |
.50 cal |
|
|
MTR 60 |
21 |
63 |
16 |
12 |
Mtr 50* |
|
|
SW |
425 |
SW |
167 |
SW |
||
Japanese player: sergio64 - American player: oxpinguin